

Slackness makes the dog wait at the door
It's cold... hurry up dad and let me in!

Problem: My dog, Kora, get’s locked out of the house when the wind billows and shuts the back door on her.
Actual Solution: Be more attentive to the location of my dog…
My dog Kora is a wonderful little creature who is a GSD (German Shephard) with nothing but love for everything she meets. So it’s a rather sad state of affairs when her owners, myself and my wife, don’t bother to pay attention to her when she’s locked out in the back garden. This is my attempt at producing a technological solution to that little problem. It’s not a dire problem, it happens maybe once every few month but I like a challenge and have the means to be able to acheive what I want with the systems I have running in my house.
Technology Utilised: Home Assistant, Frigate, Door Sensor and an Outdoor PoE Camera.
So the logic for this one isn’t too complicated and I only need to know the states of two things. Is the door shut, and can we detect a dog (any dog) in a specific location on my camera. That should cover all of my variables and states anyway, even with multiple dogs the logic should still be applicable. I don’t care what dog it is, and there’s never a stray dog in my garden or at least it’s a rare enough situation it can be discounted.
Psuedo Code:
IF: DOOR SENSOR REPORTS CLOSED AND DOG OCCUPANCY IS DETECTED

THEN: SEND A NOTIFICATION AND PICTURE OF THE BACK DOOR TO ME AND MY WIFE
So how did I go about it?
The first step of this system is utilising a wonderful, and free, NVR with AI Object Detection, called Frigate. I am not going to bother detailing how to setup and install the applications as they all have wonderful documentation and a myriad of community contributions for that purpose. These instructions are at a higher level of actually utilising and combining the technology which I often find lacking.
Frigate has a very handy feature, one of many, called Zones, that you can use to mark off an area and detect when an object your tracking breaks the area/zones boundary. To set this up we need to generate some yaml code for firgates configuration. Frigate allows you to do this in the UI just about which makes this a lot easier. Navigate to the camera you’d like to set a zone up on and click on the debug option and you should see something similar to the below.
Yes my dog has a lot of balls she doesn’t bother to tidy up in the garden!

Click the little blue “Mask & Zone creator” button and we will get up Frigates editor to allow us to generate the masks and zones. You should see 3 sections, Motion Masks, Zones and Object Masks. We’re only bothered about Zones here so you can ignore the other two options. I do recommend checking out the Frigate documentation on the other two options though as they are just has handy as this one! Click the “Add” button and we can draw on our first Zone. For me it looked like the below image…

Now there’s some things to take into account here when your drawing the zone. It will help a lot with false positives too. With Frigate I generally try to draw my zones as they would be laid on the floor. This is because of the angle my camera is pointing. Looking above you can see my gate is directly behind my door. So to the camera/frigate, if my zone included that, my dog could be stood at the back gate and my notification would trigger when she isn’t trying to get inside. This is largely dependent on your camera position. So if it doesn’t really work for your use case then you’ll have to move it to a better position or bring in another camera as they can share zones. Anyway with that zone done, we can now move over to Home Assistant where the magic happens.
On Home Assistant I’ll be utilising an Automation to trigger the initial state check, and a script that allows me to fire off the notification. It’s using some more advanced techniques for scripting in Home Assistant so it might be worth reading their documentation on how to pass variables through to the script! If you don’t know how to create scripts or automations, you’ll have to figure that out before proceeding too.
Let’s start with the Trigger Automation:
Here I’m just making sure the backdoor occupancy sensor for dogs is checked, and it needs to be in the state of “on” for 7 seconds. 7 seconds is a completely arbitary number I came up with after testing the notification for a while. 10 seconds I seemed to miss my dog been at the door (I did not force the situation to test!) as she wondered away and 5 seconds wasn’t long enough to actually trigger the alert. Your mileage may vary on that one.
trigger:
  - platform: state
    entity_id:
      - binary_sensor.back_door_dog_occupancy
    to: "on"
    for:
      hours: 0
      minutes: 0
      seconds: 7
Then the conditions that allow the trigger to pass:
I only want this automation to trigger the action if my back door is closed so I make sure that is the case here. I actually have a left and right back door but we don’t use the right one so wasn’t worth checking the state there. If that’s your situation then you can just add it as an OR or AND condition, i.e. both doors closed or just one of them is closed.
condition:
  - condition: state
    entity_id: binary_sensor.right_back_door
    state: "off"
And finally the action we’d like:
This action utilises a custom script I’ve setup to notify only the mobile devices that are at our home location. I didn’t want to be getting notifications whilst out and about and couldn’t sort the problem anyway. The script expects some data to be sent through with it and there is available a title, message and camera field so I can customise and re-use the script for all of my notification automations.
action:
  - service: script.notify_everyone_who_is_home
    data:
      title: It looks like the dogs stuck outside!?
      camera: back_garden_dog
The full yaml script for the automation.
alias: House Warning - Dog Left Outside
description: ""
trigger:
  - platform: state
    entity_id:
      - binary_sensor.back_door_dog_occupancy
    to: "on"
    for:
      hours: 0
      minutes: 0
      seconds: 7
condition:
  - condition: state
    entity_id: binary_sensor.right_back_door
    state: "off"
action:
  - service: script.notify_everyone_who_is_home
    data:
      title: It looks like the dogs stuck outside!?
      camera: back_garden_dog
mode: single
That’s the trigger taken care of. You could watch for the back door closing state to trigger the check a little faster but I didn’t want Home Assistant pointlessly checking the condition everytime we shut the door. This way the trigger is based solely from the occupancy been reported from Frigate.
Edit: Triggering from the door state wouldn’t work anyway as Home Assistant will only evalute on a change, not a current state. To get the trigger to fire, we must use the variable that will actually change in our logic not the condition for firing.
Take note of the camera variable I used. This will be referenced from the entities you get in Home Assistant from Frigate and you’ll need to pass this through to the script.
Now for the script!
In Home Assistant I like to keep a decent seperation of concerns between automations, scripts and scenes. They are pretty robust in the sense that there is a myriad of methods you could apply to the current offerings, I just like to keep myself limited to some extent so I know where I am and what everything does at a glance. If I learnt one thing from learning to code… it’s that you shouldn’t rely on your memory! Especially mine…
First the fields section:
The fields section is optional from my testing but following the rule above “Don’t rely on your memory” then write down something that will jog yours. It also helps when your testing the scripts in developers tools as they will hint at the available variables. I’m hoping that home assistant pulls that through to the automation screen eventually but for now it’s somewhere at least.
fields:
  title:
    description: The notification title!
    example: Example Text
  message:
    description: The notification content
    example: Example text
  camera:
    description: The current camera image to attach to the notification... expects a camera sensor!
    example: front_door_camera
Then the sequence of commands to run:
You could use the new options feature here rather than two IF - THENS, it would probably be cleaner but I’m stuck in my ways if IF - THENS. Basically all I’m really doing is making sure either myself or my wife are at home and if we are then utilise the notify mobile service to send through the notification with the snapshot of the dog.
The magic happens with the variables inside the {{ }} braces. Home assistant will replace those with whatever you pass through to the script. If they’re not included it’s smart enough to ignore the values.
  - if:
      - condition: state
        entity_id: person.james_mackay
        state: home
        enabled: true
    then:
      - service: notify.mobile_app_cph2009
        data:
          title: "{{ title }}"
          message: "{{ message }}"
          data:
            image: /api/camera_proxy/camera.{{ camera }}
  - if:
      - condition: state
        entity_id: person.lucy
        state: home
    then:
      - service: notify.mobile_app_lmackay_2
        data:
          title: "{{ title }}"
          message: "{{ message }}"
          data:
            entity_id: camera.{{ camera }}
Finally the complete script.
alias: Notify - Everyone Who is Home
fields:
  title:
    description: The notification title!
    example: Example Text
  message:
    description: The notification content
    example: Example text
  camera:
    description: The current camera image to attach to the notification... expects a camera sensor!
    example: front_door_camera
sequence:
  - if:
      - condition: state
        entity_id: person.james_mackay
        state: home
        enabled: true
    then:
      - service: notify.mobile_app_cph2009
        data:
          title: "{{ title }}"
          message: "{{ message }}"
          data:
            image: /api/camera_proxy/camera.{{ camera }}
  - if:
      - condition: state
        entity_id: person.lucy
        state: home
    then:
      - service: notify.mobile_app_lmackay_2
        data:
          title: "{{ title }}"
          message: "{{ message }}"
          data:
            entity_id: camera.{{ camera }}
mode: single
So what does the final notification look like? Does it work as intended?… would I make any improvements going forward after using it for a while?
Firstly the end result. It’s ace!
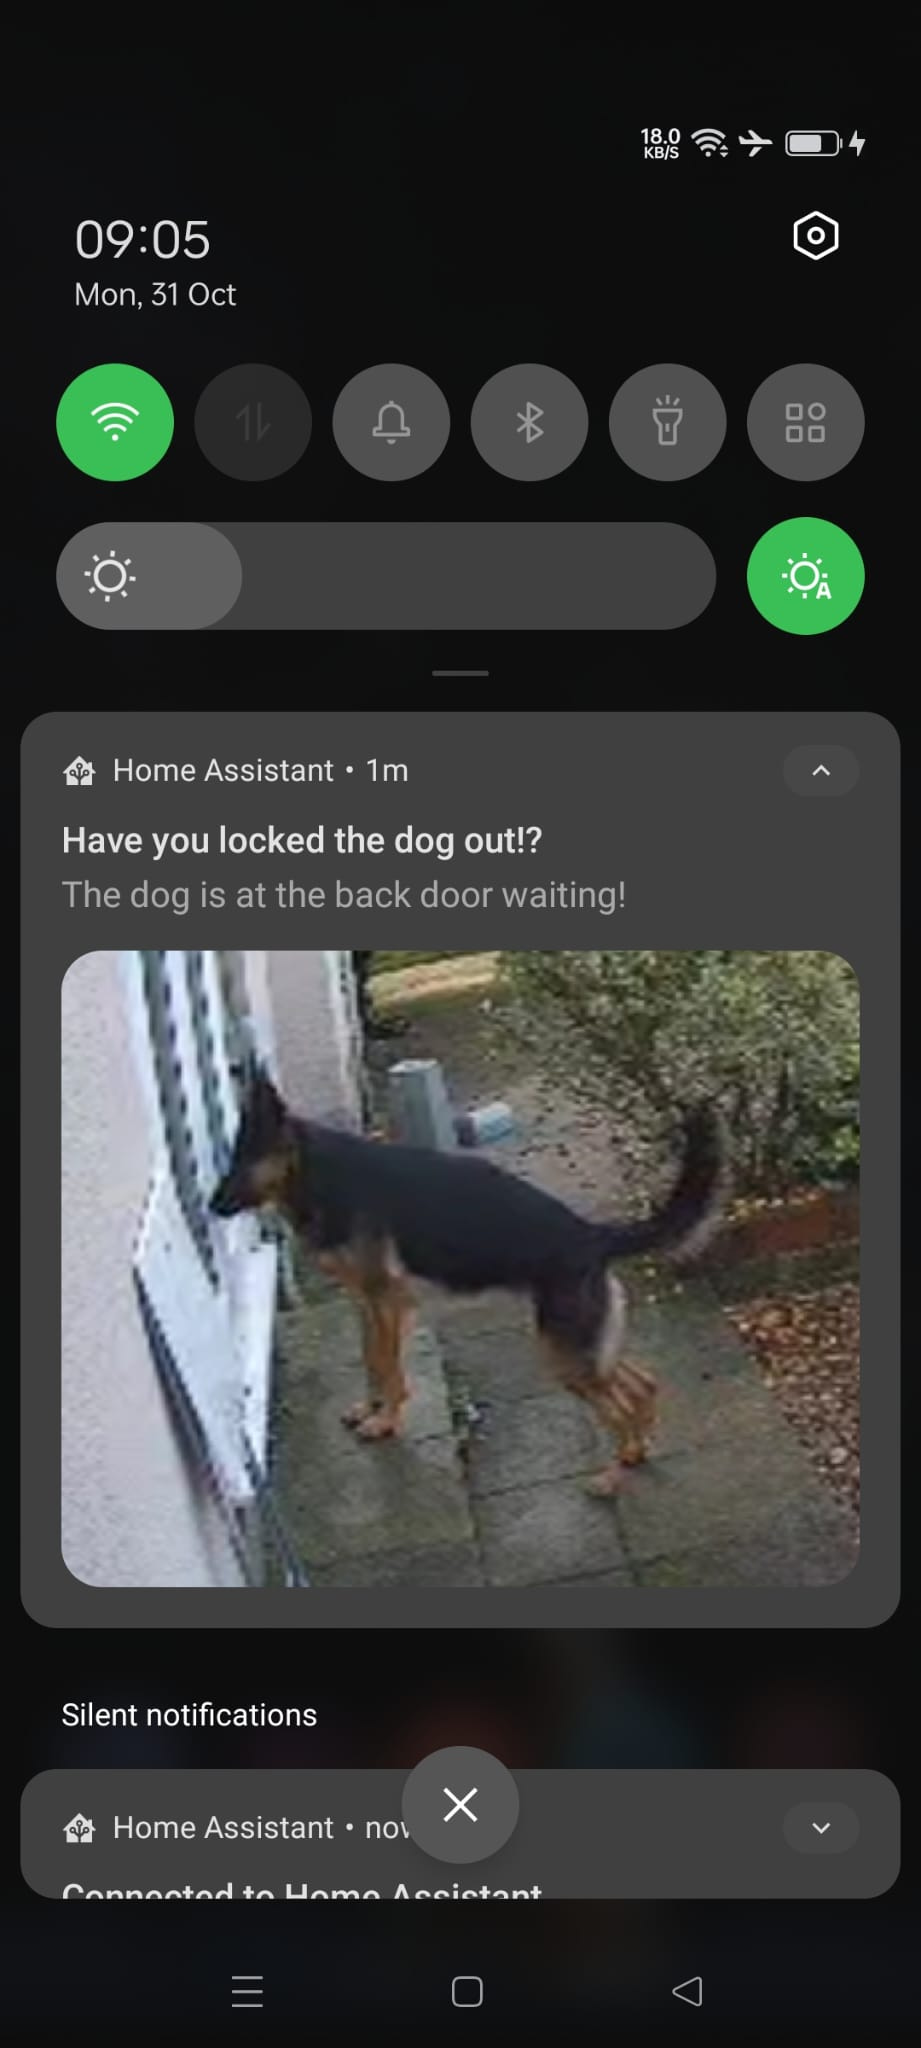
The automation currently works perfectly fine for my use case and I’ve yet to have any issues with it. Originally I was getting some false positives but after playing around with the timing that has all cleared up and I haven’t had a false positive since I settled on 7 seconds. I usually don’t get the action shot I got above, she’s usually just with her bum plonked on the floor, staring at the door, waiting paitently.
There are improvements I would make but they’re more centered around how I’ve utilised the scripts and automations features within Home Assistant and not with the triggers but those are going to be saved for another post. The method I’m using to detect how long she’s been in that state isn’t ideal either as it won’t survive editing any automations or a home assistant reboot. So depending when it happens it could be inbetween one of those times, especially on a weekend. That’s easily fixed with Timers though.
If you’ve the available hardware and software to run this automation I recommend it. It could be used similary for cats, or a few other set of objects that are available to Frigate’s system and certainly applied to more area’s. Frigate allows tracking an object through multiple zones as well so if you do play with this and improve it then I’d love to hear about it with a comment!